Budget Overview
Here is a breakdown of our application's main layout. Hover over the highlighted sections to learn more about each feature.
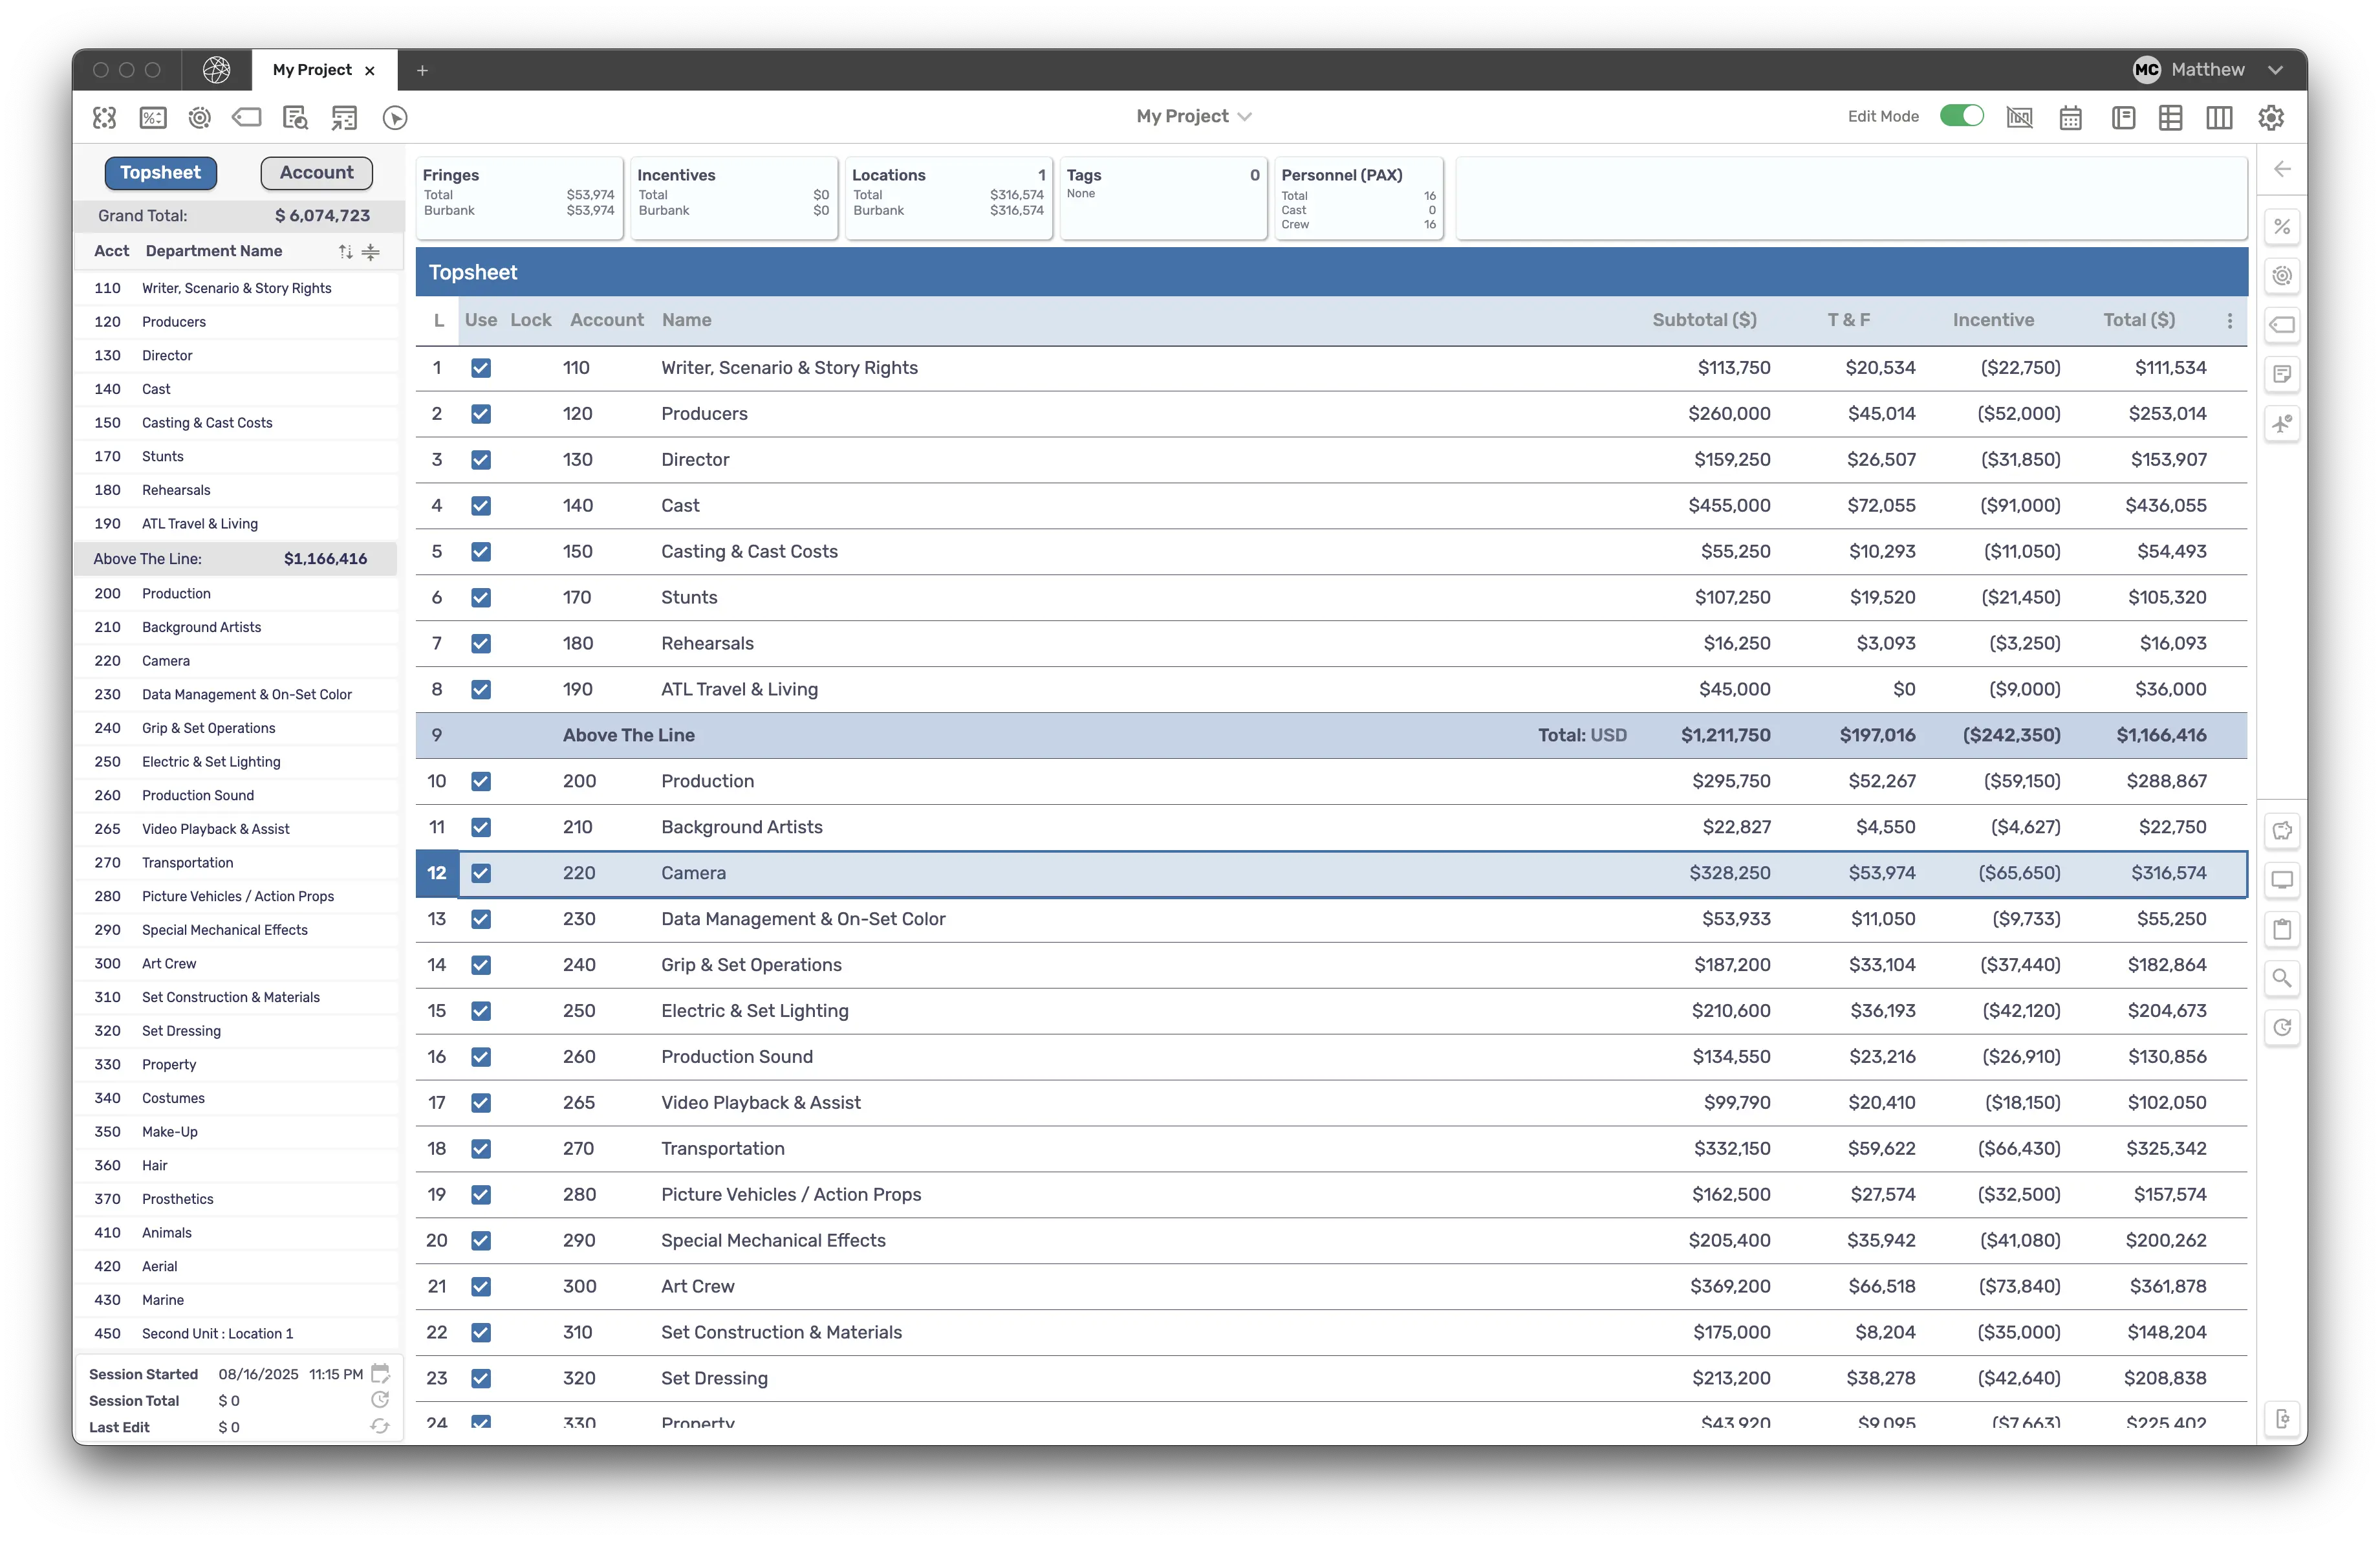
This article is a tour of the budget window — what's on screen when you open a budget, what each part is for, and where to read more. Each section below has its own detailed article.
Application tab bar
The bar across the very top of the window is shared by everything you have open:
- Dashboard tab — the Line logo at the far left. Click it any time to return to the Dashboard (and from there the Library, Elements and Ratebooks) without closing your budgets.
- Budget tabs — one tab per open budget or ratebook, showing its name (hover a truncated name to see it in full). Click to switch, × to close. With three or more tabs you can drag a tab out to give it its own window, or drop it onto another Line Budgeter window.
- + New Budget — the + button at the end of the tabs opens the Budget Builder in a new window. It's grayed out (with an upgrade tooltip) if your plan's active-budget limit is reached.
- Connection badge — appears at the right when you're not simply online: Offline Mode (you chose to work offline), No connection (the network dropped — your changes will sync when service resumes), and a brief Online badge when you reconnect.
- Account Manager / profile menu — your avatar and name at the far right. The menu shows your Plan and Budgets used, the connection status with a Go Offline / Go Online button (choosing Go Offline asks "Are you sure you want to enter Offline Mode?"), the workspace switcher (Your Project Library and, if you have any, Your Workspaces), Account Manager (Manage Profile, Billing and Security — opens My Account, Billing, Security and Workspaces), Log out, and the app version.
- On Windows the ☰ button at the left of the bar opens the Application Menu; on macOS those menus live in the system menu bar.
While in Offline Mode, switching workspaces and Go Offline are disabled, All Projects in a workspace library is unavailable, and shared budgets wait to sync until you're back online.
The three levels of a budget
Every Line Budgeter budget is a three-level grid:
| Level | What it holds | Key columns |
|---|---|---|
| Topsheet | The major accounts (departments) and their rolled-up totals, plus production subtotals and budget adjustments. | Use, Lock, Account, Name, %, Subtotal, T & F, Incentives, Total, Variance |
| Account | The accounts (minors) inside one major. | Use, Account, Name, Page, %, Subtotal, T & F, Incentives, Total |
| Details | The individual line items inside one account — the place you actually enter amounts, units, rates and fringes. | Use, Sub Account, Title/Name, Details, Line Type, Location, Phase, Start/End Date, Episodes, Amount, Unit, Multiplier, Rate, Currency, Subtotal, Tax & Fringe, Incentives, Total (and more — see ViewShift) |
Double-click (or use the Navigator) to drill down; the Topsheet / Accounts / Details buttons at the top of the Navigator take you back up. Edits at any level roll up to the levels above immediately.
Edit Mode. Each open budget has an Edit Mode switch in the top-right of the toolbar. Off = the grids are read-only; on = you can type, insert, delete and use the right-click menus. Whether budgets open with Edit Mode on or off is a preference (Preferences → General → Budgets open with Edit Mode). The switch is locked off when the budget is locked, when you're a Guest / view-only collaborator, or when the workspace is in read-only billing mode.
Application Menu
The menu bar (native on macOS; the ☰ button on Windows) holds everything that isn't on the toolbar:
- Line Budgeter — About, Enter/Exit Offline Mode, Hide, Quit.
- File — New Budget, Print, Close Budget, Close All Budgets, Share Budget…, Export (Tab Delimited TXT, ProBooks).
- Edit — Undo, Cut/Copy/Paste, Duplicate, Delete, Insert New Account / New Line, Insert Production Total, Budget Adjustment, Subtotal, Divider.
- View — Customize Toolbar; Move Up, Drill Down, Shift Right, Shift Left.
- Budget — Budget Preferences, Element Manager, Project Details, Filter Budget, Create Sub Budget, Compare Budgets, Show/Hide Associated Reference Lines, Show/Hide Variance Comparison, Line Caps, Fringe Ranges.
- Tools — Batch Fringe Tool, Batch Incentive Tool, Batch Insert Line Tool, Calendar, Change Log, Ratebook Manager, Rate Entry, Reports, Worksheet.
- Window — Minimize, Bring All to Front, and a list of every open budget and tool window.
- Help — Quick Tour, Keyboard Shortcuts, Support, Release Notes, Terms & Conditions, Privacy Policy.
→ Application Menu lists every item and its shortcut.
Budget Toolbar
The strip across the top of the budget. Left side by default: Elements, Tax & Fringe, Incentives, Tags, Ratebooks, Rate Entry. Center: the budget name with a ▾ menu (Rename, Share, Duplicate, Go to Project, About this Budget, Pin to Dashboard, Lock Budget, Close Budget). Right side: the Shared Budget connection pill (when applicable), the Edit Mode switch, then Show/Hide Amounts, Toggle Smart Group, Calendar, Reports, Worksheet, ViewShift, Preferences. Extra buttons (Universals, Episodes, Filter, Jump Back) and icons-vs-text display are set under View → Customize Toolbar.
→ Budget Toolbar explains each button.
Navigator
The left-hand panel (the app also calls it the Navigation Sidebar): an expandable tree of majors and accounts with flag colors, lock icons and optional totals; Sort and Collapse All buttons; right-click to Pin Account Open or Lock Account. Click any row to jump straight to it.
→ Navigator.
ViewShift
On the Details level, ViewShift switches the line-item grid between Minimal View (the everyday columns) and Full View (adds Tags, Universals, Qualified, Assoc. Ref., LineCap, Tracking 1–2, Co. Unit and the five User columns). The choice, and each view's column widths, are remembered per budget. The toolbar button's label flips between Minimal View and Full View to show what you'll switch to.
→ ViewShift.
Heads Up Display & Banner
The banner that runs across the top of the grid, with its live read-out (also available as the Heads Up panel in the Sidebar). On the Topsheet and Account levels it summarizes Fringes, Incentives, Locations, Tags and Personnel (Cast / Crew) for the current selection; on the Details level it shows the Fringes, Incentives, Tags, Universals, Line Cap and Episodes applied to the selected line. The Sidebar footer also shows a Selected Total for whatever cells you've highlighted.
Sidebar
The right-hand tool panel: Tax & Fringes, Incentives, Tags, Notes, Pre Flight, Universals, Episodes, Associate Reference, Search, Heads Up, Change Log and the Clipboard Manager. Apply fringes or incentives to selected lines, add notes, search and replace, and check pre-flight warnings without leaving the grid. Use the gear (Customize Side Bar Elements) to arrange tools into Top, Bottom and On The Sideline, and the ↗ button on any tool to pop the Sidebar into its own window. In a workspace an admin can make the Sidebar view-only for a member.
→ Sidebar.
Session Tracker
The small block at the bottom of the Navigator: Session Started (opens the Calendar), Session Total — the net change to the budget since you started (opens the Change Log), and Last Edit, with a reset button to start a fresh session. Goalpost budgets show Assumption Amount and Local Spend Amount here instead.
Multiple Windows
- Every budget (and ratebook) opens as a tab in the application tab bar. With three or more tabs, drag a tab out of the tab bar to give that budget its own window, or drop it onto another Line Budgeter window to move it there.
- Tools open in their own windows — Budget Builder, Element Manager, Preferences, Calendar, Worksheet, Rate Entry, Change Log, Reports, Sidebar, Account Manager — so you can spread a budget across monitors. They're all listed under the Window menu, and File → Close All Budgets closes every budget tab at once.
- Edit Mode and your selection stay in sync across a budget's windows.
Where to go next
Read the articles in this section in order for a full walkthrough, then continue to Features (Batch Fringe Tool, Batch Incentive Tool, Batch Insert, Compare Budgets, Filters, Sub Budgets…) for the tools you'll use day to day.